How to Make Videos with Claude Code: From Your First Clip to a Full Motion Pipeline
Published: October 15, 2026 · 18 min read
A practical guide to making motion-graphics videos with Claude Code and Claude Opus 5.5. It covers how the rendering works, setup, a one-line prompt for beginners, a seek(t) engine you own, spring motion, beat-synced audio, self-review, and packaging the workflow as a skill, with code.
More and more people are making videos with Claude Code
Your X timeline is probably full of AI-made product videos lately. Text bounces in, and the screen morphs from one shape into the next.
Most of them aren't made with a video-generation model. They're made with Claude Code: you give Claude Opus 5.5 a prompt, and it writes a program that draws the video.
Yet many people try the same prompts and get something that looks nothing like the clips they saw. So what's the difference?
It's the setup around the prompt. Once Claude Code can draw, render, watch, and fix its own work, the results change dramatically.
This guide walks through:
How Claude Code turns code into video
For beginners: setup and a first clip from a one-line prompt
Intermediate: prompting for your own product
Advanced: your own renderer, spring motion, and beat sync
Long-form videos, self-review, and packaging it all as a skill
If you're new, the first half is enough to ship a video. If you already make them, feel free to jump to the second half.
How Claude Code turns code into video
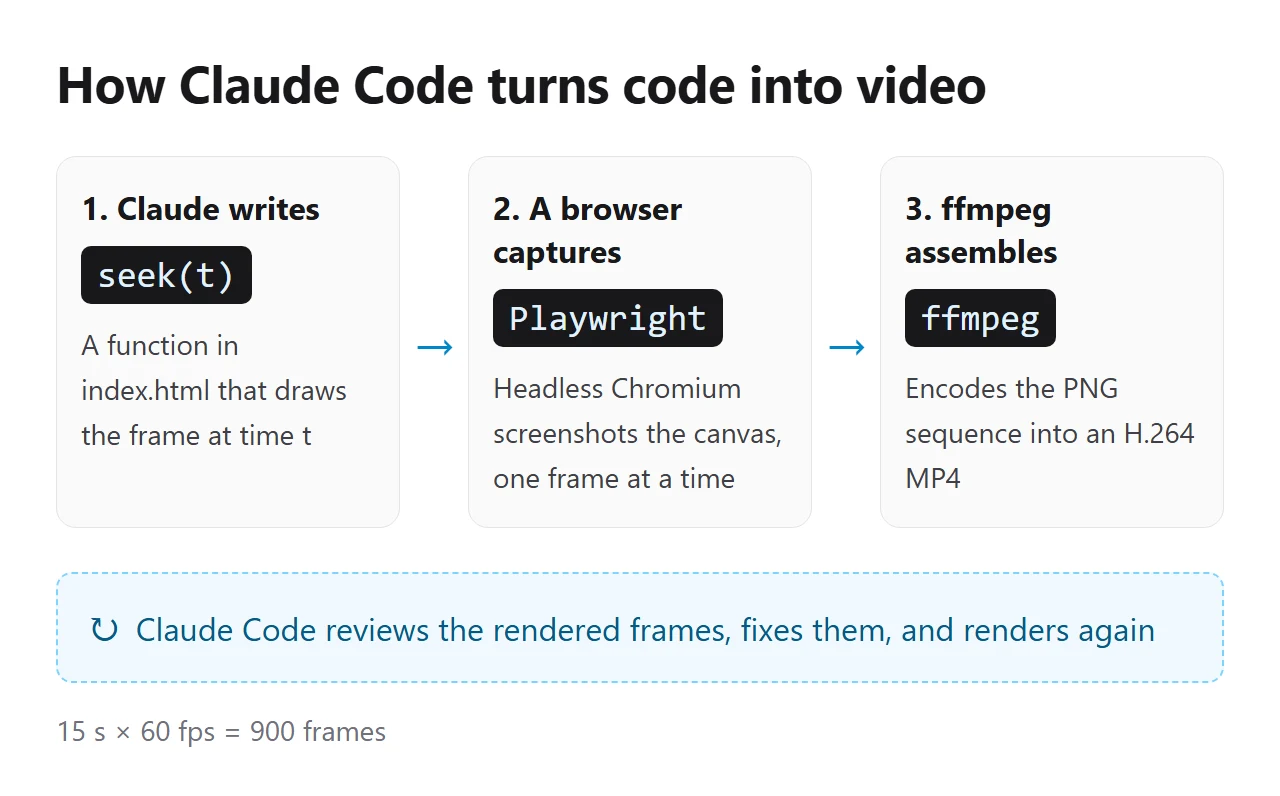
Claude returns text and images, so it can't hand you an MP4 directly. Instead, it writes a program that draws each frame.
The pipeline has three steps:
Claude writes a function that draws the frame for any given time
A headless browser calls it and captures one frame at a time
ffmpeg stitches the captured images into a video
Fifteen seconds at 60 fps means 900 images. That's tedious by hand, but Claude Code can run the whole thing itself.
The setup matters more than the prompt
The author of the source article puts it this way: the prompt is only about 10% of the video. The rest is the loop that draws, checks, and fixes.
A chat window can write animation code too. But it can't render or inspect anything, so you only get one shot.
Claude Code runs commands and looks at the frames it rendered. That ability to watch and fix is what separates great clips from average ones.
Left alone, Claude often builds a single HTML file
According to the source article, Opus 5.5 usually builds the video as one dependency-free HTML file unless told otherwise.
If you want a video framework like Remotion or HyperFrames, name it in the prompt. We compare the options later on.
Setting up Claude Code for video
First, gather the tools. If you're comfortable with a terminal, this takes about ten minutes.
Claude Code requires a Pro, Max, Team, or Enterprise plan, or a Console account. It isn't included in the free plan.
Install Claude Code and the video tools
Install Claude Code with the official one-liner: curl on macOS and Linux, PowerShell on Windows.
For video you'll use four tools:
Node.js 22+: runs the render script
ffmpeg: turns image sequences into video and mixes audio
Playwright with Chromium: drives a headless browser to capture frames
Python with librosa: measures the beat of a music track (only if you want sync)
You don't have to install them yourself. Ask Claude Code to "set up a video-making environment" and it will check what's missing and install it.
# Claude Code (macOS / Linux)
curl -fsSL https://claude.ai/install.sh | bash

# Claude Code (Windows PowerShell)
irm https://claude.ai/install.ps1 | iex

# In a working folder, install the capture browser
mkdir my-video && cd my-video
npm init -y
npm i -D playwright
npx playwright install chromium

# For audio work
pip install librosa soundfile numpy
Write your video rules in CLAUDE.md
CLAUDE.md is a rules file that Claude Code reads every time it starts working. Put it in the root of your folder.
Move the rules you'd otherwise repeat in every prompt into it. For example:
# Video studio rules

- Draw every video with window.seek(t) in index.html. The frame must depend only on t
- Never use Math.random() or Date.now(). Use a fixed seed when randomness is needed
- Render with node render.mjs. Default is 1080x1920 at 60 fps
- Animate with spring(). Avoid constant-speed moves and plain fade-ins
- Keep text at least 80px from the frame edges
- After rendering, make a contact sheet, review it yourself, and fix issues before reporting
- Read API keys from .env. Never write them into prompts or code
Use Claude Opus 5.5
Video work needs both composition and fine-grained tuning. Type /model inside Claude Code and pick Opus 5.5.
Launching with claude --model claude-opus-5-5 does the same.
Add video skills (optional)
A skill gives Claude Code a playbook for a specific task. Several video skills are public:
Remotion's official skills: teach Claude how to build videos in React
HyperFrames: HeyGen's open-source tool that renders HTML and CSS into MP4
claude-animation-skill: a skill for a hand-drawn animation look
You don't need any of them to start. Add one once you know which direction you like.
For beginners: your first Claude Code video from a one-line prompt
With the tools ready, make one clip from a short prompt. The goal is to run the whole pipeline once, all the way to an MP4.
Make a 15-second vertical showreel that shows off the motion
graphics Claude Code can make. Use a different technique in each
shot and open with the strongest one. Handle the render yourself
and produce out.mp4. Go all out.
Why such a short prompt works
A showreel is a fast-cut demo of someone's best work. It's a well-known format, so even a short prompt describes the finished piece.
Fifteen seconds is short enough to finish in one pass. It usually ends up as six to eight shots.
The closing "go all out" signals that you want maximum effort, not a quick sketch.
Variations to try next
Once that works, add one condition at a time:
Change length and shape: "60 seconds, 16:9, scored to a piano track"
Avoid the AI look: "No centered text that just fades in"
Tell a story: "Tell the history of an invention, vertical format"
Give it a role: "You're the director of an award-winning motion studio"
The limits of a one-line prompt
A one-liner tests whether your pipeline works. It can't express what you actually want to say.
And since many people use the same one-liners, the results tend to look alike. The next sections show how to make videos that are yours.
Making a product video for your own service with Claude Code
Add your product details to the one-liner. The source article shows a product video made by adding just three things:
The product URL
"Use real screenshots, the logo, and real assets"
"It must have music"
In that example, a video the maker used to pay an agency over $1,000 for took under 30 minutes.
Keep one conversation per brand
The conversation that made your first clip already has the render setup and your brand details. Ask for the second video there and it comes together faster.
Start a new conversation for a different product. That keeps colors and logos from bleeding across brands.
Handle API keys carefully when adding voice
With a voice service like ElevenLabs, you can give a mascot a voice. Put the API key in .env and refer to it only by name in the prompt.
Never paste a real key into a prompt. It leaks the moment you share the prompt or post it on social media.
Removing the generic AI look from Claude Code videos with references
Without references, the model falls back on the usual look: a gradient background with centered text gently fading in.
To avoid that, show it the look you want with images or video. There are three ways to do it.
Three kinds of reference: a frame, a video, a library
One frame: copy the palette, type, and texture, but not the subject
A reference video: have ffmpeg extract frames, then describe the pacing shot by shot
An image library: have Claude write style_guide.md first and treat it as the rulebook
Good places to look include motion work on Dribbble and other companies' launch videos.
# Extract a frame every 0.5 seconds from a reference video
mkdir ref
ffmpeg -i reference.mp4 -vf fps=2 ref/%03d.png
Describe the look, not the library
"Make it look like cut paper" works better than "use p5.js."
That lets Claude pick the rendering approach that fits the look. Only name a tool when your team has already standardized on one.
Give Claude Code the states of the video, not the vibe
UI animations, where an app screen smoothly morphs from one state to the next, are especially popular. Asking for something "slick" rarely works for these.
Instead, list what the screen looks like at each point in time. Wrapping the sections in XML-style tags makes them harder to misread.
<video>
  <format>1080x1920, 60fps, 12s. The last frame matches the first so it loops</format>
  <look>White background, black text. One accent color only: #7c5cff</look>
  <states>
    0.0s  A round "Save" button. The cursor approaches
    1.5s  Click. The button shrinks into a loading ring
    3.0s  The ring stretches sideways into a progress bar
    5.0s  The bar expands into a "done" card
    8.0s  The card closes and morphs back into the button
  </states>
  <rules>
    - One shape only. No cuts; connect states through size, radius, and color
    - Every change is triggered by the cursor
  </rules>
  <watch-out>
    - Text must never overflow the box while it morphs
  </watch-out>
</video>
One shape that never cuts
The heart of this format is a single shape that becomes a button, a loader, and a chart without ever breaking.
The cursor triggers each change, and the last frame returns to the first. Looped on social media, the seam disappears.
Turning the morph into a story
The same idea works for short stories that use the app screen as a stage. Buttons and cards play the characters.
Treat each state in the list as a scene and it becomes much easier to write.
Advanced: owning a seek(t) video engine in Claude Code
This part is about keeping the rendering engine itself in your own folder. Build it once and reuse it for every video.
At its center is seek(t), a function that draws the frame for time t. It never depends on the previous frame, so you can render from any moment.
The minimum setup: index.html and render.mjs
index.html holds a 1080x1920 canvas and seek(t). The example below is four seconds long: a circle pops in, then a headline rises into place.
<!doctype html>
<html>
  <body style="margin:0;background:#0b0b0f">
    <canvas id="c" width="1080" height="1920"></canvas>
    <script>
      const ctx = document.getElementById("c").getContext("2d");
      const W = 1080;
      const H = 1920;

      // 時間 t(秒)だけで値が決まるバネ。0 から 1 へ、少し行き過ぎて止まる
      function spring(t, { stiffness = 170, damping = 18 } = {}) {
        if (t <= 0) return 0;
        const w = Math.sqrt(stiffness);
        const z = damping / (2 * w);
        if (z >= 1) return 1 - Math.exp(-w * t) * (1 + w * t);
        const wd = w * Math.sqrt(1 - z * z);
        return 1 - Math.exp(-z * w * t) * (Math.cos(wd * t) + ((z * w) / wd) * Math.sin(wd * t));
      }

      const lerp = (a, b, p) => a + (b - a) * p;

      // 指定した時刻のコマを描く。同じ t なら、何度呼んでも同じ絵になる
      window.seek = (t) => {
        ctx.fillStyle = "#0b0b0f";
        ctx.fillRect(0, 0, W, H);

        // 0.2 秒:円が弾むように現れる
        const pop = Math.max(0, spring(t - 0.2));
        ctx.fillStyle = "#7c5cff";
        ctx.beginPath();
        ctx.arc(W / 2, H / 2 - 220, 170 * pop, 0, Math.PI * 2);
        ctx.fill();

        // 0.8 秒:見出しが下からせり上がる
        const rise = spring(t - 0.8, { stiffness: 120, damping: 20 });
        ctx.globalAlpha = Math.min(1, Math.max(0, rise));
        ctx.fillStyle = "#ffffff";
        ctx.font = "700 104px system-ui, sans-serif";
        ctx.textAlign = "center";
        ctx.fillText("Hello, motion.", W / 2, lerp(H / 2 + 330, H / 2 + 200, rise));
        ctx.globalAlpha = 1;
      };

      window.seek(0);
    </script>
  </body>
</html>
Capture each frame and encode an MP4 with render.mjs
render.mjs opens index.html in Playwright. It steps through time, calls seek(t), screenshots the canvas, and pipes each frame into ffmpeg.
Run node render.mjs and out.mp4 appears in the same folder.
import { chromium } from "playwright";
import { spawn } from "node:child_process";
import { once } from "node:events";
import { pathToFileURL } from "node:url";
import path from "node:path";

const FPS = 60;
const DURATION = 4; // seconds
const OUT = "out.mp4";

// ffmpeg receives PNG frames on stdin and encodes them as H.264
const ffmpeg = spawn(
  "ffmpeg",
  ["-y", "-f", "image2pipe", "-framerate", String(FPS), "-i", "-",
   "-c:v", "libx264", "-crf", "16", "-pix_fmt", "yuv420p", OUT],
  { stdio: ["pipe", "inherit", "inherit"] },
);

const browser = await chromium.launch();
const page = await browser.newPage({ viewport: { width: 1080, height: 1920 } });
await page.goto(pathToFileURL(path.resolve("index.html")).href);
const canvas = page.locator("#c");

const total = FPS * DURATION;
for (let i = 0; i < total; i++) {
  await page.evaluate((t) => window.seek(t), i / FPS);
  const png = await canvas.screenshot({ type: "png" });
  if (!ffmpeg.stdin.write(png)) await once(ffmpeg.stdin, "drain");
}

ffmpeg.stdin.end();
await once(ffmpeg, "close");
await browser.close();
console.log(`Rendered ${OUT} (${total} frames)`);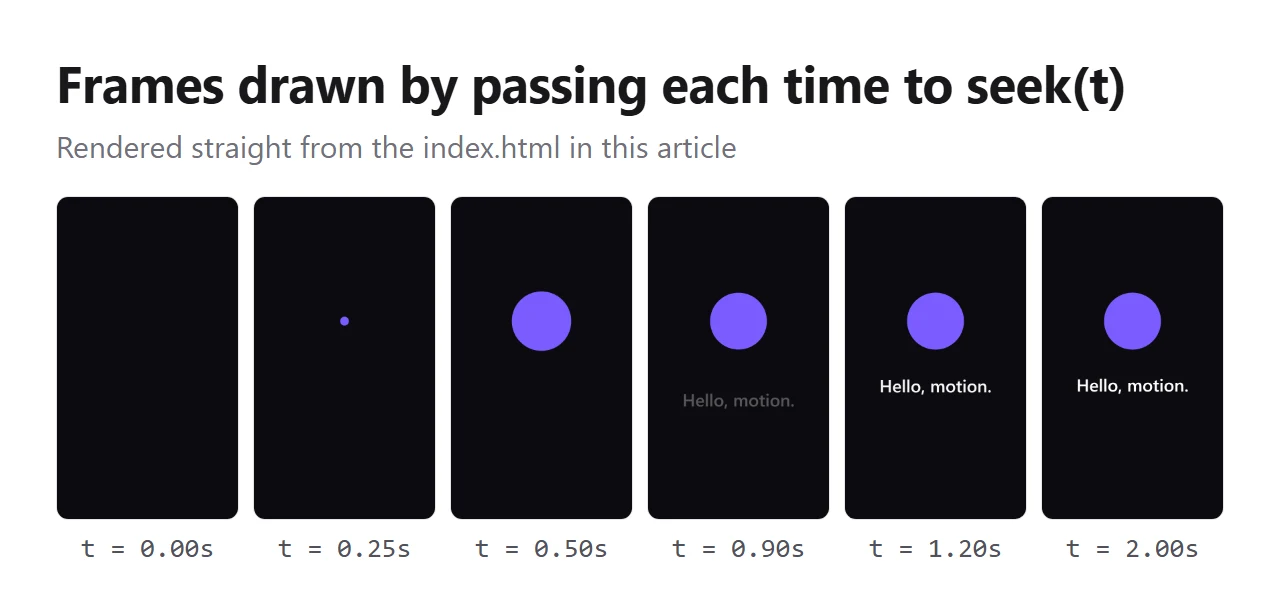
Render settings and motion blur
The script renders at 60 fps in H.264 with CRF 16. Lower CRF means higher quality, and 16 is very clean.
For motion blur on fast moves, capture at 240 fps and blend every four frames down to 60. ffmpeg's tmix filter does the blending.
If you only need the canvas, reading it with toDataURL instead of screenshot is faster.
Remotion and HyperFrames are options too
Video frameworks give you a preview UI and render commands out of the box.
Remotion: write videos as React components. Start with npx create-video@latest
HyperFrames: write HTML and CSS, then render to MP4 with npx hyperframes render
Remotion has license terms for company use. Check the terms on its site before you adopt it.
The two-file setup has one big advantage: you understand every line. When in doubt, start there and switch once you outgrow it.
Making Claude Code videos feel premium with spring motion
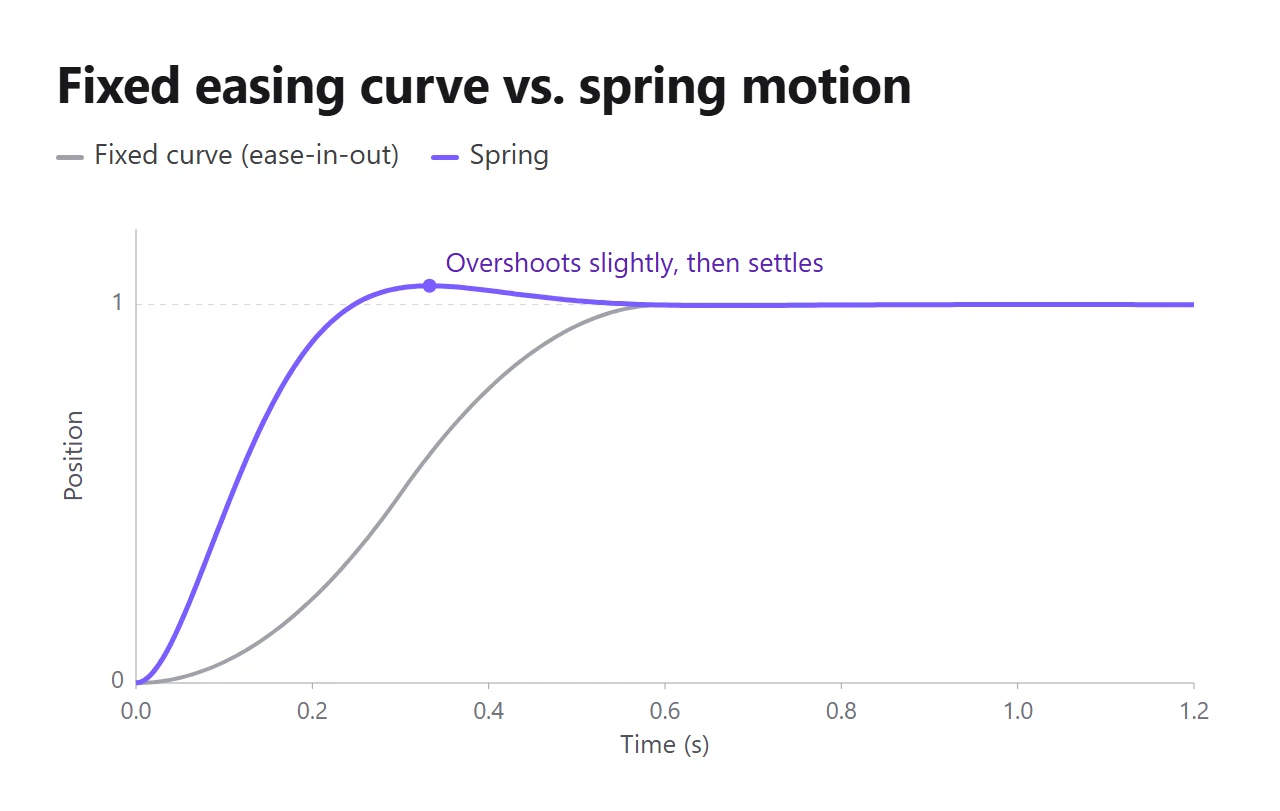
Most cheap-looking videos animate along fixed easing curves. Every move starts and ends at the same rate, so nothing feels like it has weight.
Premium motion has mass: it accelerates, overshoots slightly, and settles. You get that from a spring.
Write springs as a pure function of time
You can simulate a spring step by step from the previous frame. But then you can't render a frame in the middle without computing everything before it.
The spring() in index.html above is closed-form: position depends only on elapsed time. seek(t) draws the same frame from any starting point.
Stack springs when the target changes
Some things, like a cursor, change destination many times. Add one new spring each time the target changes.
Each spring starts at its own time. Summed together, the motion stays smooth and continuous.
Tune stiffness per element
Driving everything with the same spring looks flat. Match stiffness and bounce to how heavy each element should feel.
Buttons and toggles: stiff, settle fast
Cards and camera moves: default stiffness
Big type and logos: heavy, settle slowly
Mascots and stickers: soft, with visible overshoot
Syncing Claude Code video to the beat
Sound changes how a video feels. There are two ways to sync it:
Measure the beats of a track you have, then time the picture to them
Generate sound effects or music in code along the picture's timeline
Measure beat times with librosa
This script writes the track's BPM and beat times to beats.json. Run it as python beats.py music.mp3.
downbeats is a rough guess at the start of each bar, every fourth beat. Depending on how the track begins it can be off, so check by ear.
import json
import sys

import librosa
import numpy as np

y, sr = librosa.load(sys.argv[1])
tempo, frames = librosa.beat.beat_track(y=y, sr=sr)
beats = librosa.frames_to_time(frames, sr=sr).tolist()

json.dump(
    {
        "bpm": round(float(np.atleast_1d(tempo)[0]), 1),
        "beats": beats,
        "downbeats": beats[::4],
    },
    open("beats.json", "w"),
    indent=2,
)
Put cuts and sound effects on the beat
Give beats.json to Claude and ask it to cut on downbeats and land small moves on beats. Picture and sound then line up numerically.
Clicks and whooshes can be synthesized in Node.js from raw waveforms. No hunting for sound libraries, and no licensing worries.
Mix picture and sound into one file
Finally, combine them with ffmpeg. For social media, normalize to about -14 LUFS so your video isn't louder or quieter than its neighbors.
ffmpeg -i out.mp4 -i music.wav \
  -af loudnorm=I=-14:TP=-1:LRA=11 \
  -c:v copy -c:a aac -b:a 192k -shortest final.mp4
Writing a director's brief for long Claude Code videos
Videos longer than a minute need more than a short prompt. Write a long brief, the kind a director hands a production crew.
The source article describes a roughly 9,500-character brief that produced a 142-second music video overnight while its author slept.
What to put in the brief
What the video is, in one line
Reference images and videos
Allowed tools and API keys, plus a spending cap
Characters' looks and personalities
A beat-by-beat timeline: a hook in the first two seconds, a payoff every three to five
Rules for on-screen text
Checkpoints, and how Claude should review its own work
Deliverables: resolution, aspect ratios, file names
Split scenes across subagents
Claude Code can hand work to other Claude instances called subagents. For long videos, building scenes in parallel finishes much faster.
Write one guide file that describes how everything should be drawn. Every scene follows the same rules, so the cuts feel consistent when joined.
Combining with video-generation models
Human motion and physics are hard to draw in code. The source article suggests generating rough shots with a video model first.
Then have Claude redraw those shots in code. The final frames are code, so you can change anything later.
Let Claude Code watch and review its own video
Claude can read images, so it can review what it rendered. This is where great clips pull furthest ahead.
It can't watch an MP4 directly, so have ffmpeg make review images.
# Contact sheet: a frame every 0.5s, 6 across x 5 down (15 seconds)
ffmpeg -i out.mp4 -vf "fps=2,scale=270:-1,tile=6x5" -frames:v 1 sheet.png

# Check how it reads at phone size
ffmpeg -i out.mp4 -vf "scale=360:-2" small.mp4

# Loop seam: export the first and last frames and compare
ffmpeg -i out.mp4 -frames:v 1 first.png
ffmpeg -sseof -0.1 -i out.mp4 -frames:v 1 last.png

# Render twice and confirm the video is identical
ffmpeg -i out.mp4 -map 0:v -f md5 -
Score it, then fix the lowest scores
After showing Claude the contact sheet, have it score each item out of 10. For example:
Does it grab attention in the first two seconds?
Is the text readable at phone size?
Are there frames where nothing moves?
Is there something new every few seconds?
Is the layout balanced?
Are brand colors and logos correct?
Does motion hit the sound?
Fix only the three weakest items and re-render only what changed. Repeat until every item scores 8 or higher.
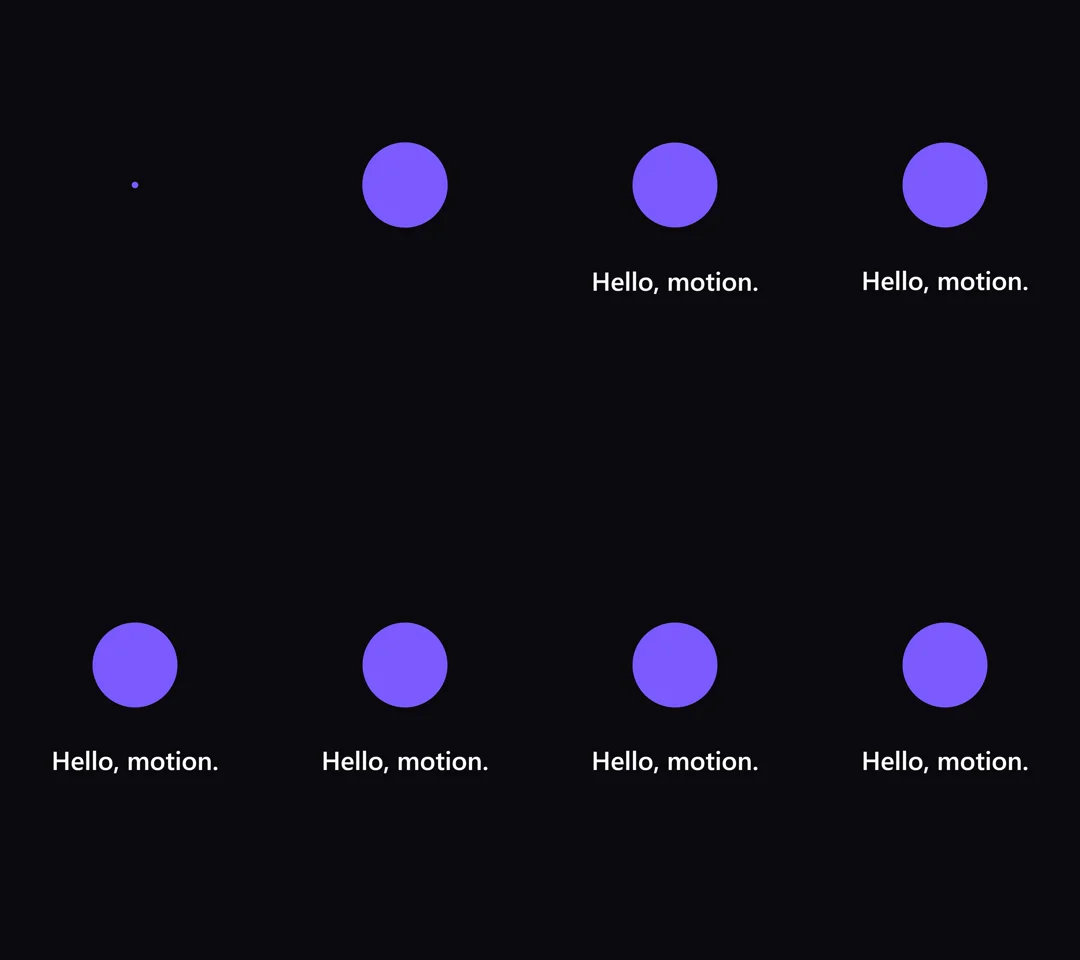
Below is a contact sheet made from this article's sample video. It shows how the frames change at a glance.
More iterations, better results
The source article mentions a watercolor short that took more than 160 model calls over nearly seven hours.
Treat the first render as a draft. Many rounds of review and fixes are the shortest path to a great video.
Exporting Claude Code videos in multiple sizes and packaging a skill
When the video is done, export it for each platform. Vertical 9:16, square 1:1, and landscape 16:9 cover almost everywhere.
Reframe per format instead of cropping
Cropping a vertical video into landscape cuts off text or leaves awkward empty space.
Don't hard-code coordinates. Route positions through a layout function that reads the frame's width and height, so one timeline can reframe for every size.
Package the workflow as a skill
Turn a workflow that works into a Claude Code skill. Save it as .claude/skills/motion-reel/SKILL.md:
---
name: motion-reel
description: Makes a promo video from a product URL. Use when asked to "make a video" or "make a reel"
---

# Steps

1. Open the URL and collect the logo, screenshots, and brand colors into assets/
2. Write color, type, and motion rules into style_guide.md
3. If there is music, measure the beats with beats.py
4. Write a shot list on the beat grid in shots.md
5. Draw it with seek(t) in index.html
6. Make a contact sheet, score it, and fix every item below 8
7. Export 9:16, 1:1, and 16:9, then mix in the audio

# Input

$ARGUMENTS (URL, duration, aspect ratio, reference image)
The next video is one line
With the skill in place, ask in one line: /motion-reel https://example.com 20s 9:16.
The source article also shows people selling videos made this way as a service.
See Claude Code videos and their prompts on DesignLayer
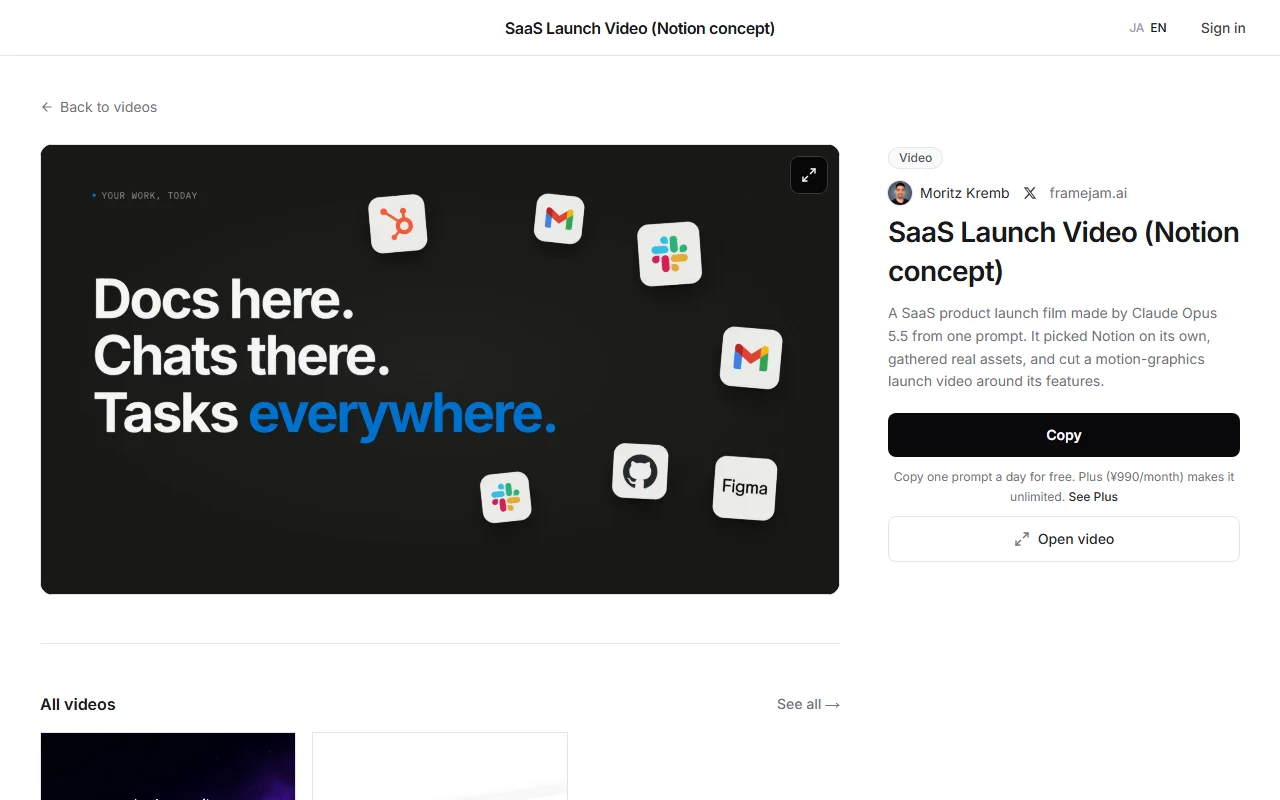
Before you build, it helps to see what prompts other people used. DesignLayer's video page plays product videos made with Claude.
For example, Moritz Kremb's "SaaS Launch Video" is a 46-second launch film Opus 5.5 made from a single prompt. Opus picked Notion as the subject on its own, gathered real assets, and cut a feature video around it.
Each video comes with the prompt used to make it. Copying a prompt is free once a day, and unlimited on Plus. https://design-layer.com/en/videos
You can submit your own, too. Sign in with GitHub and send your video and prompt; it goes live after review.
Frequently asked questions about making videos with Claude Code
Does making videos with Claude Code cost money?
Claude Code needs a paid Claude plan (Pro or higher) or a Console account. ffmpeg, Playwright, and librosa are free.
External services like voice synthesis charge their own fees.
Can I make videos without knowing how to code?
Yes. Claude Code writes the code and runs the render.
That said, learning to read a little of what Claude is doing helps you point at exactly what to fix.
Does the same workflow work on Windows?
Yes. Claude Code, Node.js, ffmpeg, and Playwright all support Windows.
ffmpeg needs to be on your PATH. If something doesn't work, ask Claude Code to check.
Should I use Remotion or my own engine?
Pick Remotion if you value a preview UI and reusable components. Pick your own engine if you want to understand every piece.
We suggest making your first few videos with the two-file setup, then deciding once you understand how it works.
How long does one video take?
With the pipeline in place, a short 15-second clip renders in tens of minutes.
Running many rounds of review and fixes, like the examples in the source article, can take several hours.
Summary: the Claude Code video workflow
Claude writes a program that draws the video; a browser captures it and ffmpeg assembles it
Install the tools and put your video rules in CLAUDE.md
Start with a one-line prompt and run the pipeline end to end
Add your URL, assets, music, references, and a state list to make it yours
Own the engine with seek(t) and spring motion
Have Claude review its own render and fix it until every score is 8+
Package what works as a skill and ask for the next video in one line
Start by rendering your first clip from a one-line prompt. You can browse other people's videos and prompts at https://design-layer.com/en/videos
References for this Claude Code video guide
This guide is a restructured adaptation of the X article "How to build motion design studio with Opus 5.5 ( Full-course )" by Movez (@0xMovez). Figures from case studies come from that article.
Original article (X): https://x.com/0xMovez/status/2104216919033192746
Installing Claude Code: https://code.claude.com/docs/en/setup
Claude Code skills: https://code.claude.com/docs/en/skills
CLAUDE.md in Claude Code: https://code.claude.com/docs/en/memory
Playwright: https://playwright.dev/docs/intro
ffmpeg: https://ffmpeg.org/
Video frameworks, skills, and collections:
Remotion AI skills: https://www.remotion.dev/docs/ai/skills
Remotion license: https://www.remotion.dev/docs/license
HyperFrames: https://github.com/heygen-com/hyperframes
claude-animation-skill: https://github.com/buildwithhanif/claude-animation-skill
ClaudeAnimationBase: https://github.com/JohnHeibel/ClaudeAnimationBase
awesome-ai-motion (prompt library): https://github.com/guanmo-ai/awesome-ai-motion
awesome-opus-5-5-videos (video collection): https://github.com/athemeroy/awesome-opus-5-5-videos